Build a Blog with Hugo and Deploy it to Cloudflare Pages
In this article, I will guide you step by step through the complete process of building a personal blog using Hugo and deploying it to Cloudflare Pages. Hugo is a fast and flexible static site generator, while Cloudflare Pages offers free static site hosting services with global CDN acceleration, allowing your blog to go live quickly and provide a good user experience. Whether you’re a technical novice or an experienced developer, this tutorial will help you quickly set up your own blog.
Why Choose Hugo and Cloudflare Pages?
- Hugo: Written in Go, it is extremely fast, supports a rich set of themes and Markdown format, making it suitable for blogs and documentation sites.
- Cloudflare Pages: Provides seamless GitHub integration, automatic deployment, free SSL certificates, and global CDN acceleration, offering better access speeds than GitHub Pages in China.
- Cost: The combination of both is completely free, making it ideal for personal blogs or small projects.
Preparation
Before you begin, you need to prepare the following tools and accounts:
- Hugo: Install the latest version of Hugo (it is recommended to use the extended version for more features).
- Git: For version control and pushing code to GitHub.
- GitHub Account: To store the source code of the blog.
- Cloudflare Account: To deploy and host the blog.
- Text Editor: Such as VSCode, to edit Markdown files and configuration files.
Step 1: Install Hugo
Windows
- Install the Chocolatey package manager (if not already installed):
POWERSHELL
Set-ExecutionPolicy Bypass -Scope Process -Force; [System.Net.ServicePointManager]::SecurityProtocol = [System.Net.ServicePointManager]::SecurityProtocol -bor 3072; iex ((New-Object System.Net.WebClient).DownloadString('https://chocolatey.org/install.ps1')) - Use Chocolatey to install the extended version of Hugo:
POWERSHELL
choco install hugo-extended - Verify the installation:
POWERSHELL
hugo version
macOS
- Install using Homebrew:
BASH
brew install hugo - Verify the installation:
BASH
hugo version
For more installation methods, refer to the Hugo official documentation .
Step 2: Create a Hugo Site
-
Create a new site in the terminal:
BASHhugo new site my-blog cd my-blogThis will generate the directory structure for the Hugo site in the
my-blogfolder:PLAINTEXT├── archetypes ├── content ├── data ├── layouts ├── public ├── static ├── themes └── hugo.toml -
Initialize a Git repository:
BASHgit init -
Add a
.gitignorefile to ignore generated files:BASHecho "public/" >> .gitignore echo "resources/" >> .gitignore
Step 3: Install and Configure Theme
-
Choose a Hugo theme, for example, hugo-theme-stack:
BASHgit submodule add https://github.com/CaiJimmy/hugo-theme-stack.git themes/hugo-theme-stack -
Copy the theme’s example configuration file to the project root:
BASHcp themes/hugo-theme-stack/exampleSite/config.yaml . -
Edit
config.yaml(orhugo.toml) to set basic information:YAMLbaseURL: "https://your-domain.com/" # Replace with your domain languageCode: "zh-cn" title: "My Blog" theme: "hugo-theme-stack" DefaultContentLanguage: "zh-cn" hasCJKLanguage: true paginate: 5
For more theme configuration, refer to the theme’s official documentation.
Step 4: Create Your First Blog Post
-
Create a new post:
BASHhugo new posts/my-first-post.mdThis will generate the
my-first-post.mdfile in thecontent/posts/directory. -
Edit the content of the post and modify the Front Matter (post metadata):
MARKDOWN--- title: "My First Blog Post" date: 2025-06-16T20:29:00+08:00 draft: false --- Welcome to the Hugo blog! This is my first post. -
Start the Hugo local server to preview:
BASHhugo server -DOpen the browser and go to
http://localhost:1313/to see the local preview of the blog.
Step 5: Push Code to GitHub
- Create a new repository on GitHub (like
my-blog), either public or private. - Push the local code to GitHub:
BASH
git add .
git commit -m "Initial commit"
git remote add origin https://github.com/your-username/my-blog.git
git branch -M main
git push -u origin main
Step 6: Deploy to Cloudflare Pages
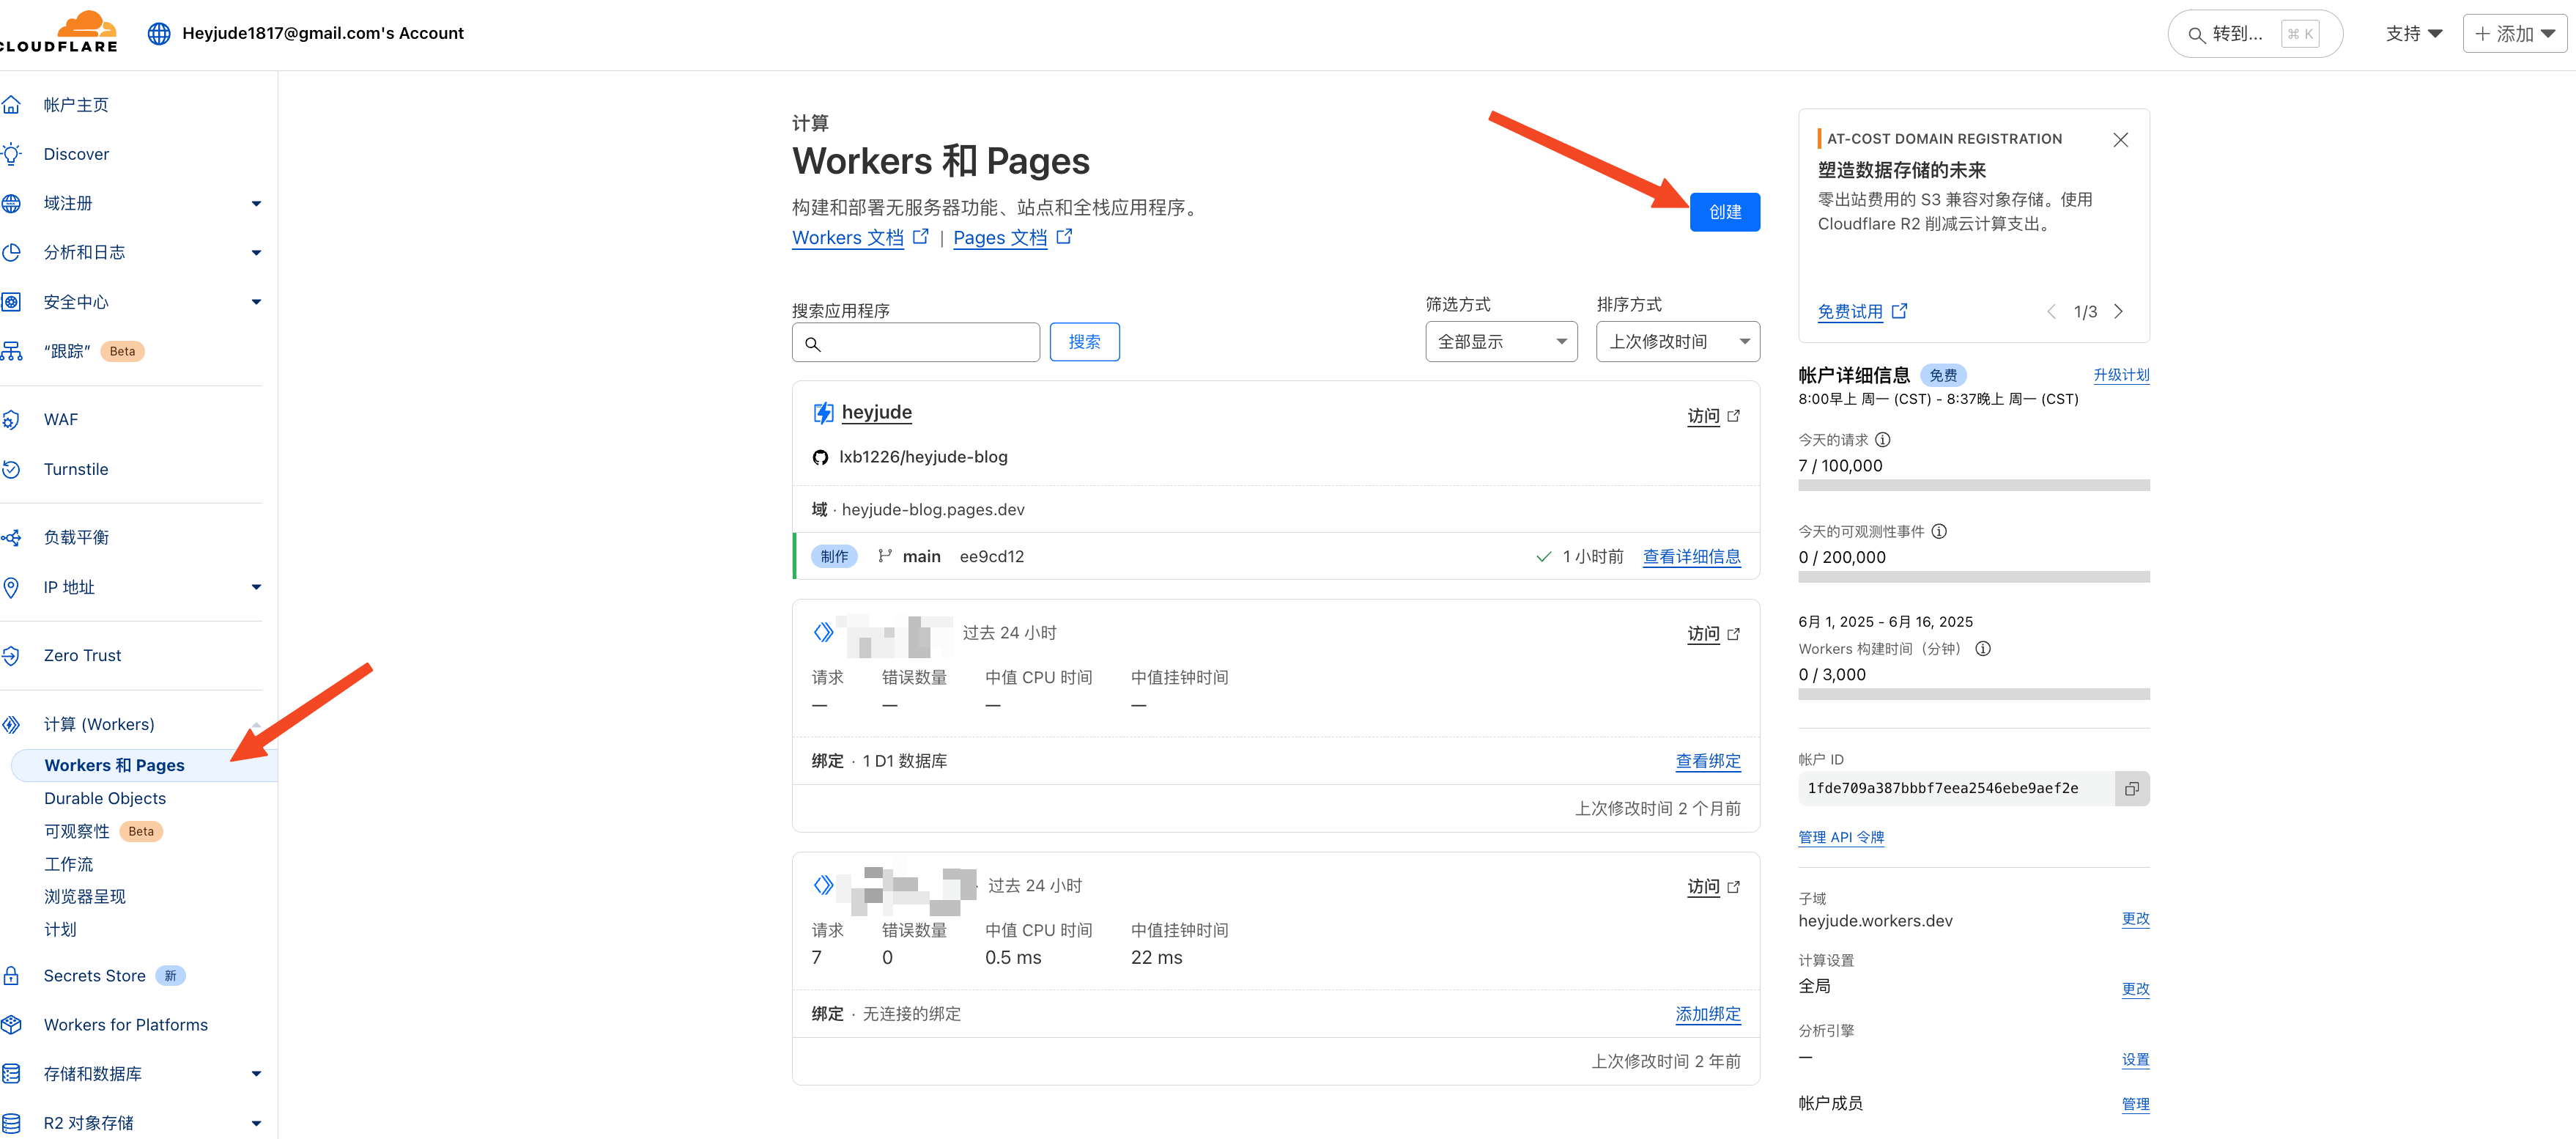
- Log in to the Cloudflare Dashboard, go to “Workers and Pages” > “Pages” > “Create a Project”.
- Connect your GitHub account and select the newly created
my-blogrepository.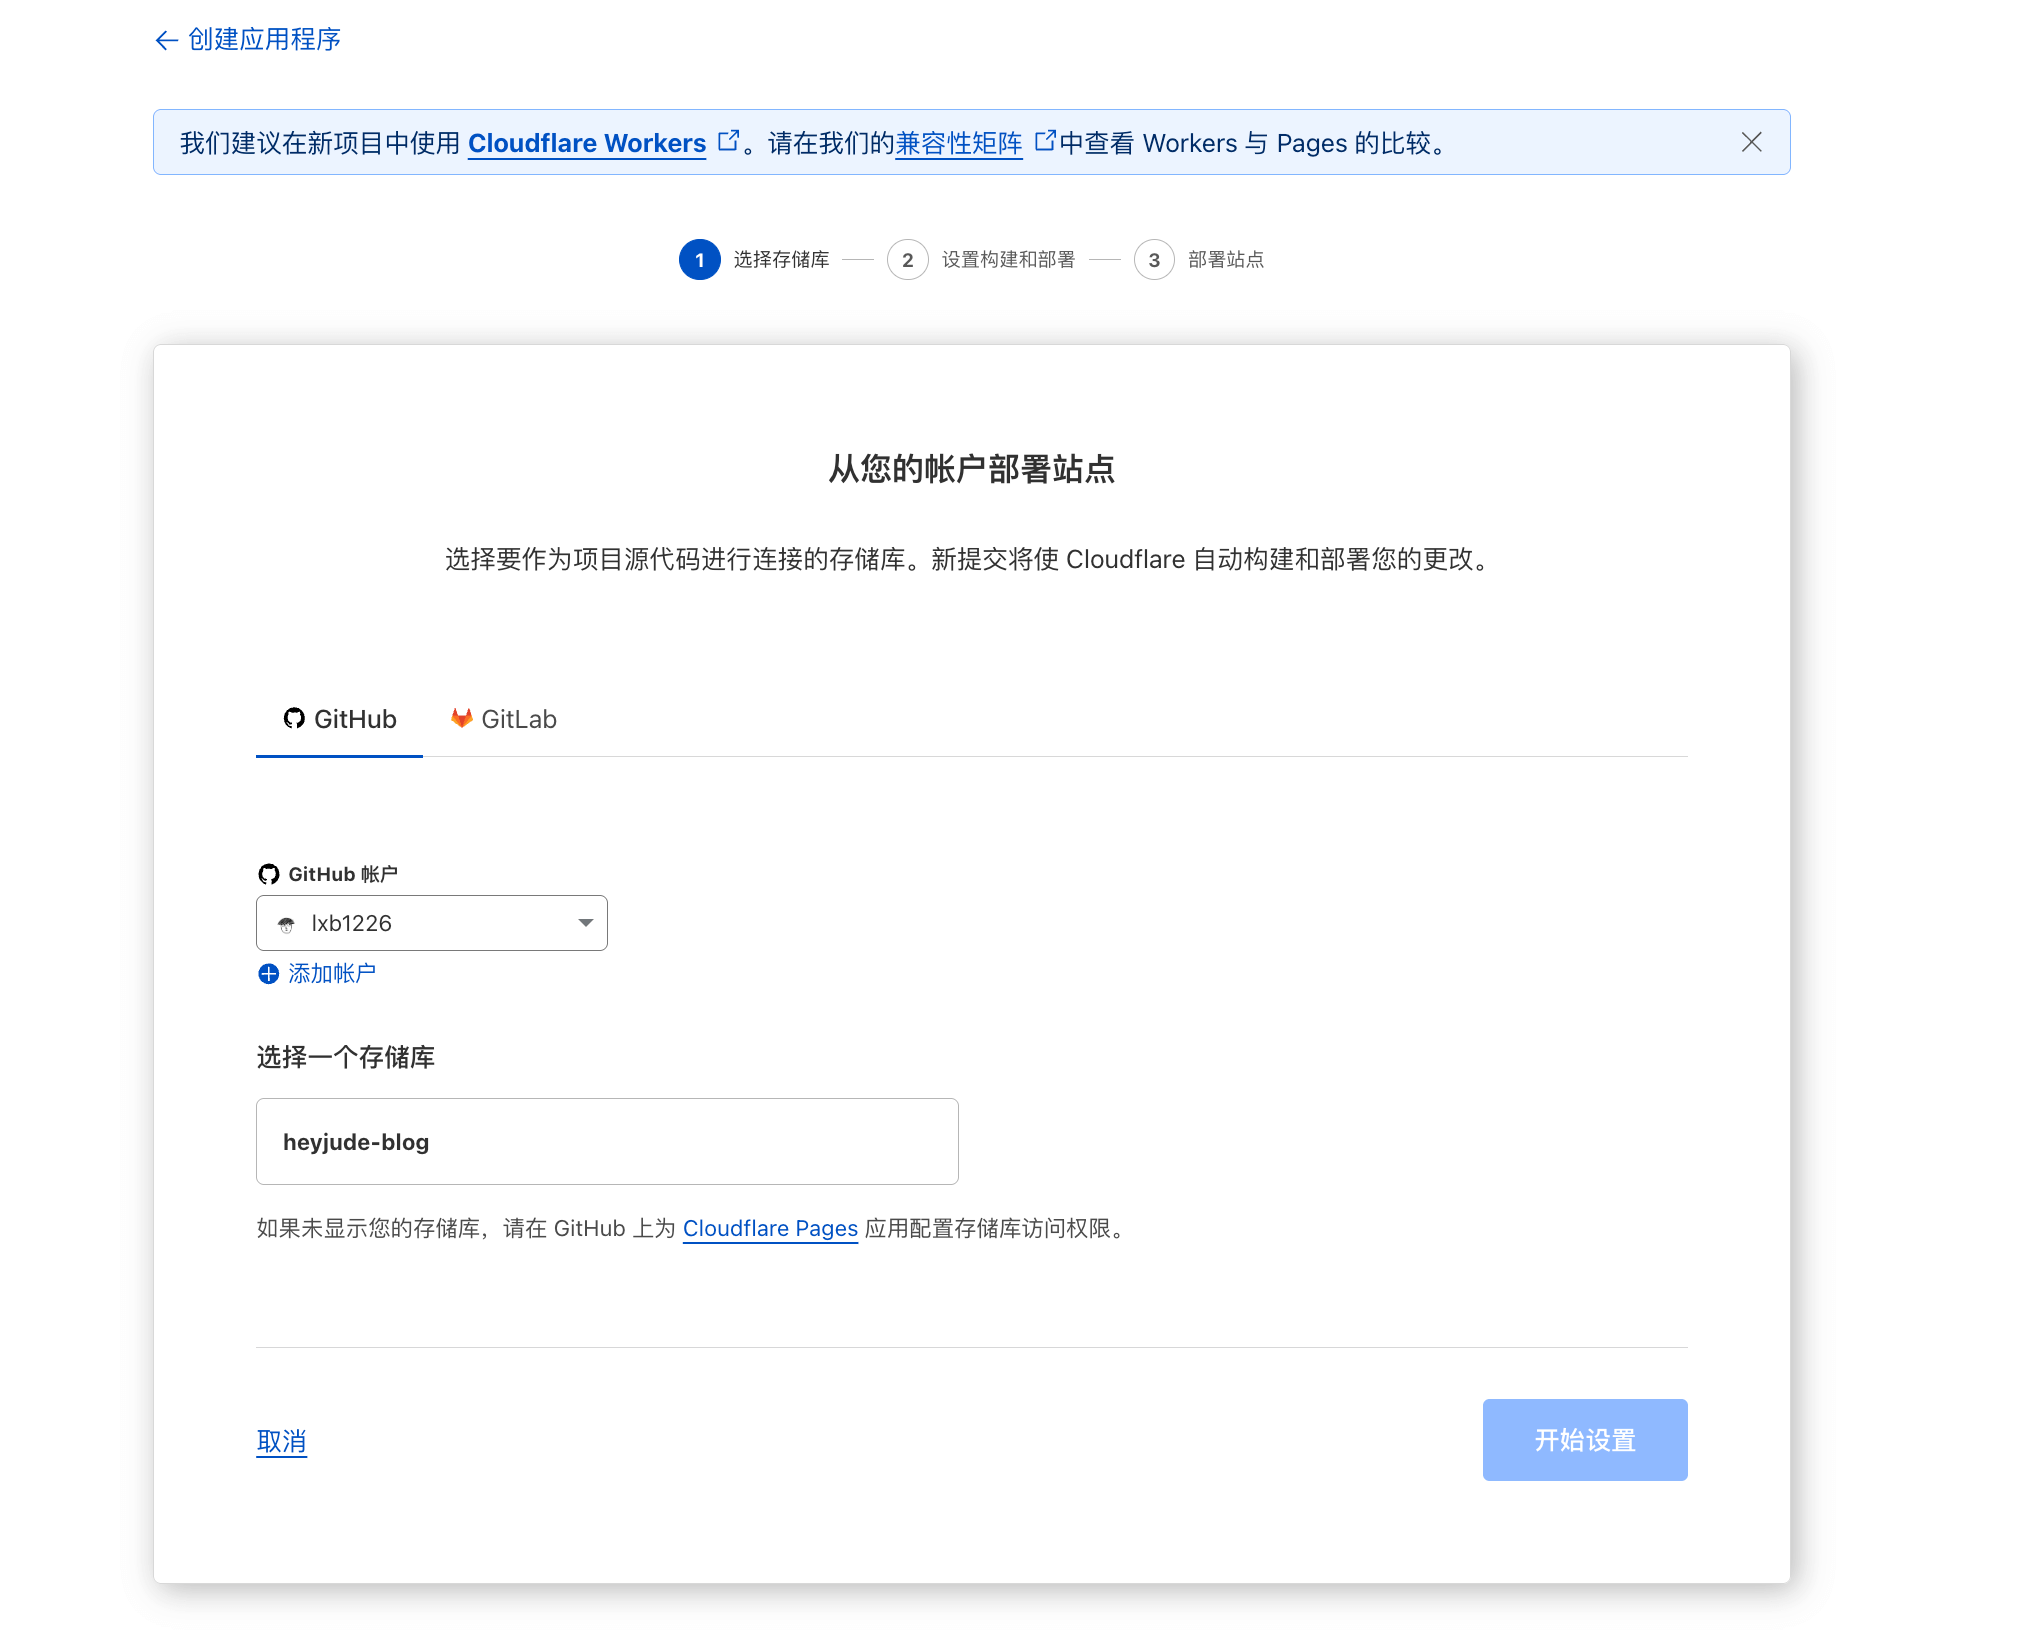
- Configure the build settings:
- Project Name: Any name (like
my-blog), it will assign a subdomain likemy-blog.pages.dev. - Production Branch: Defaults to
main. - Build Command:
hugo --gc --minify(optimizes output files). - Output Directory:
public. - Environment Variables: Add
HUGO_VERSION(like0.125.4) to specify the Hugo version, it is recommended to use the latest version; check the Hugo Releases.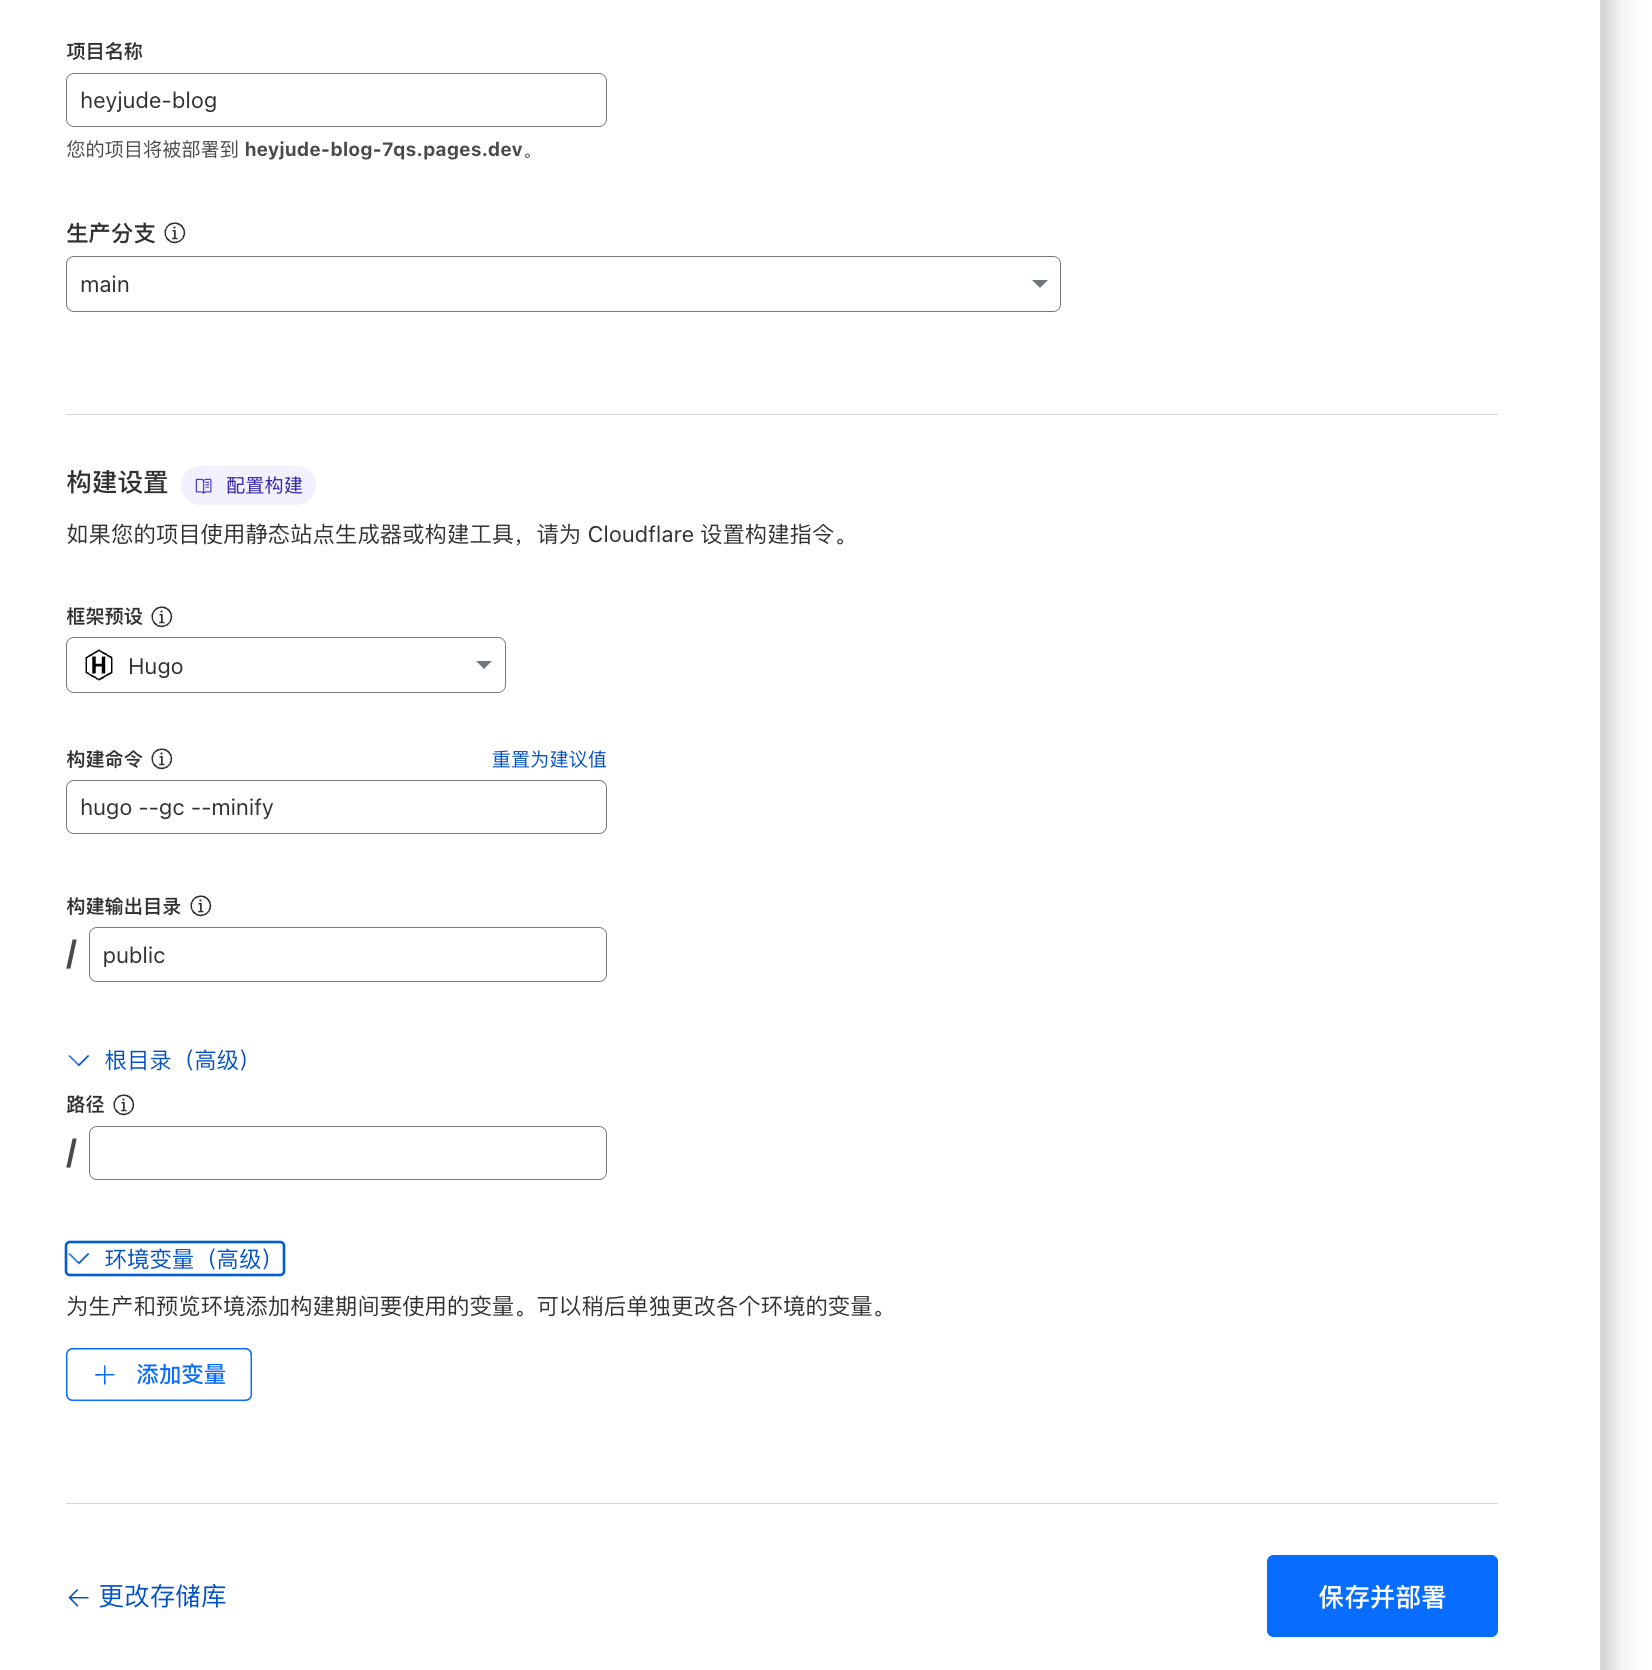
- Project Name: Any name (like
- Click “Save and Deploy”, Cloudflare Pages will automatically pull the code, build, and deploy it. Once deployment is complete, you can access your blog through
my-blog.pages.dev.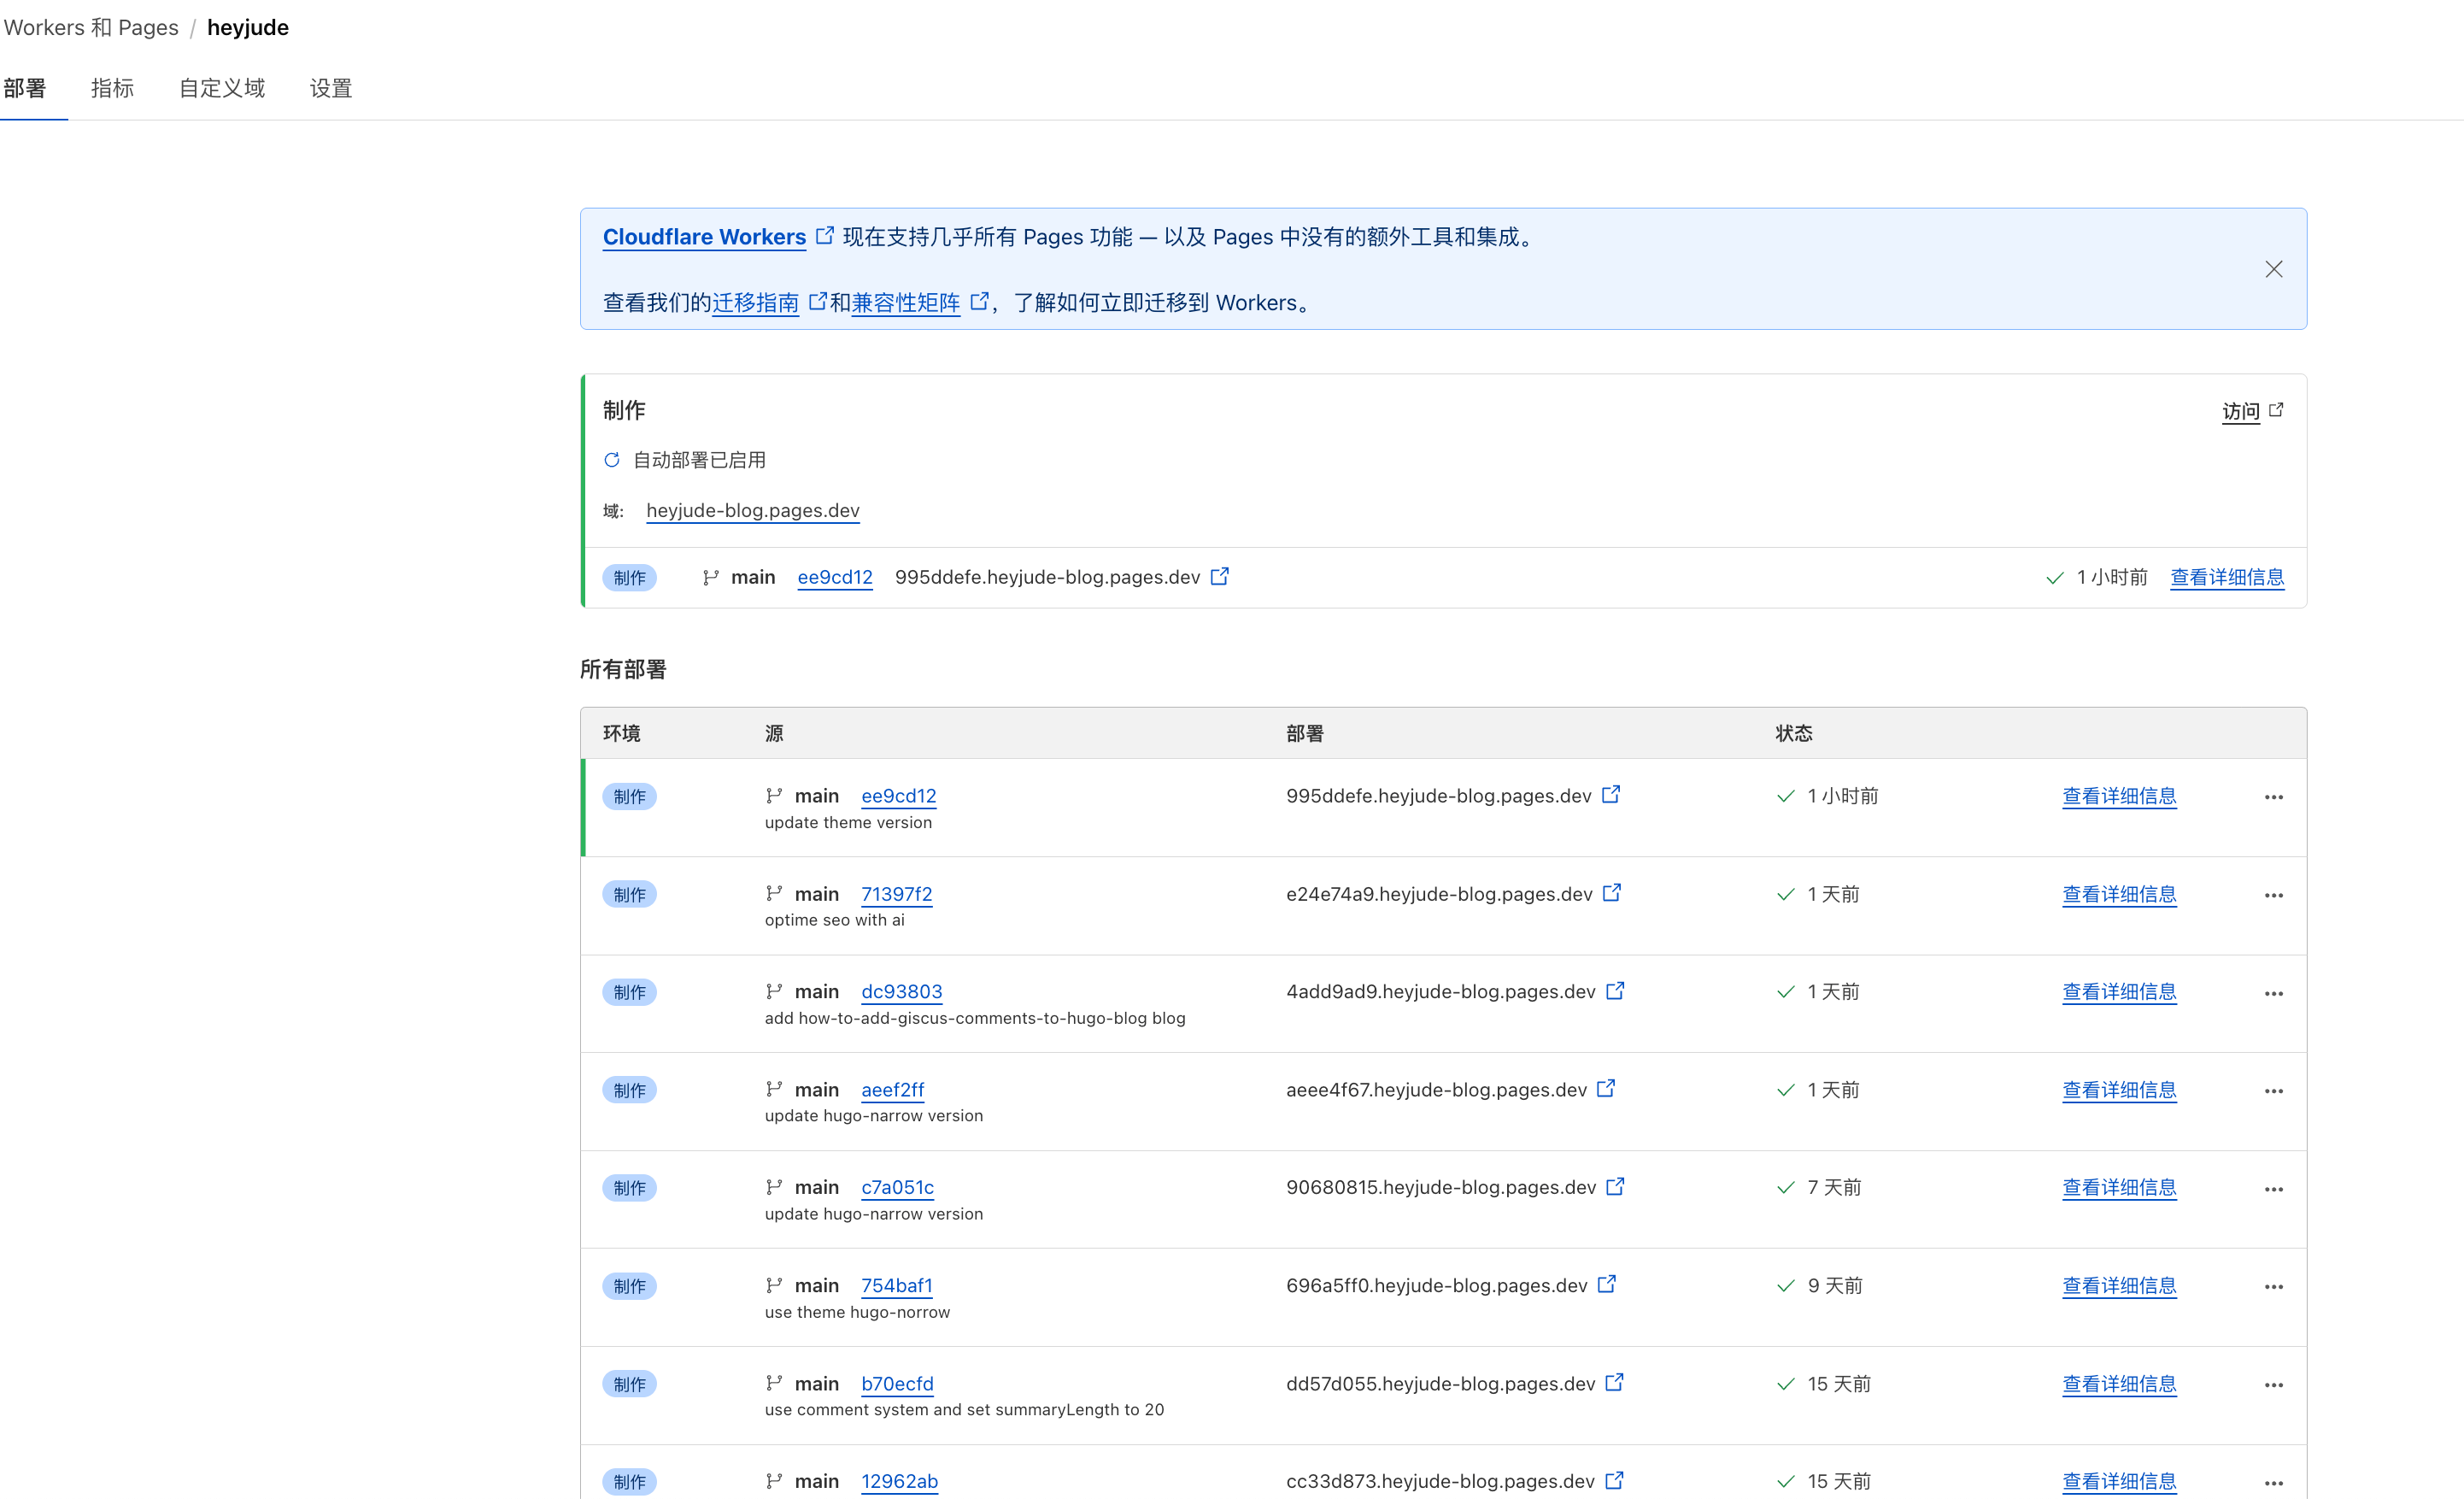
Step 7: Bind a Custom Domain
- Ensure your domain is hosted on Cloudflare (you can purchase it through Cloudflare or migrate from other registrars).
- In the Cloudflare Pages project, click “Custom Domain” > “Set Custom Domain”.
- Enter your domain (like
your-domain.com), Cloudflare will automatically add a CNAME record. - Wait for the DNS resolution to take effect (usually a few minutes to a few hours), then access your blog using the custom domain.
Step 8: Automated Deployment
Each time you update your blog content (like adding new posts or modifying configurations), just run the following commands to push the code:
git add .
git commit -m "Update blog content"
git push origin mainCloudflare Pages will automatically detect updates in the GitHub repository, rebuild and redeploy, typically completing in 1-2 minutes.
Issues and Solutions
- Mismatch in Hugo Version: Cloudflare Pages might default to an older version of Hugo, causing build failures. The solution is to specify the latest version in the environment variables (like
HUGO_VERSION=0.125.4). - Posts Not Displaying: Check if the
draft: falseis set correctly, as Hugo does not render posts withdraft: trueby default. - Slow Access Speed from China: Ensure the domain is accelerated by Cloudflare’s CDN and SSL is enabled.
Summary
With Hugo and Cloudflare Pages, you can quickly build a high-performance, free personal blog. Hugo provides flexible content management and rich theme support, while Cloudflare Pages’ automatic deployment and global CDN acceleration ensure that the blog’s publishing and access are more efficient.
Comments